In the exercise that follows, you’ll build your first basic surface with a point group:
- Open the file 0401_SurfaceFromPointGroup.dwg or (0401_SurfaceFromPointGroup_METRIC.dwg).
- On the Home tab of the ribbon ➢ Create Ground Data panel, select Surfaces ➢ Create Surface.
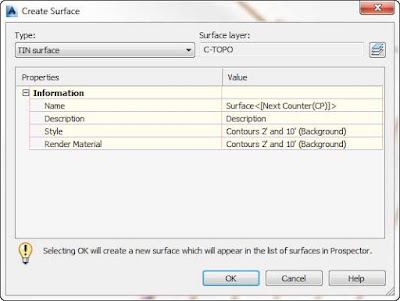
- In the Create Surface dialog, shown in Figure 1, click in the Name field.

Figure 1: Creating your first new TIN surface. - Remove the default text by highlighting it and replacing it with the name Existing Surface.
- Set Style to Contours 1’ and 5’ (Background) or Contours 0.5 m and 2.5 m (Background) for metric users and click OK.
- In Prospector, expand the Surfaces branch. You should now see your new surface in the listing.
- Expand Existing Surface and then expand Definition by clicking the tiny plus sign to the left of the listing in Prospector.
- Right-click Point Groups and select Add.
- In the Point Groups dialog, highlight TOPO Shots and click OK. You should now see contours for your surface.
- Save your drawing at the conclusion of the exercise. Compare your work with 0401_SurfaceFromPointGroup_FINISHED.dwg or (0401_SurfaceFromPointGroup_METRIC_FINISHED.dwg) if desired..
===o0o===
- Creating a Surface with Point Groups
- Adding Breaklines
- Adding Boundaries
