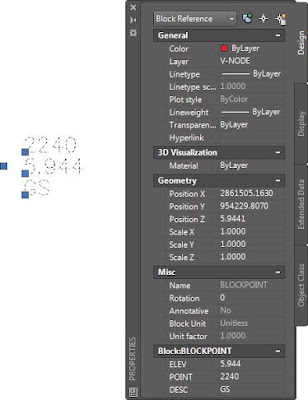
- Open the 0303_ConvertBlocks.dwg or (0303_ConvertBlocks_METRIC.dwg) file.Notice the point data in the form of blocks. You’ll see that all of them are instances of the same block, their insertion point coincides with the origin of the field shot, they have a z value assigned to each that corresponds to the field elevation, and the attribute data assigned to each instance actually contains fields that you can use. This is the best scenario for conversion of blocks (see the Figure).
To convert the data, you need to generate the text file that you can import back and create points.
Block with data that can be extracted to a text file and reimported as a Civil 3D point. - Go to the Insert tab ➢ Linking & Extraction Panel and click the Extract Data icon.
- In the Data Extraction – Begin (Page 1 Of 8) dialog, select Create A New Data Extraction. Click Next.You will be prompted to save your data extraction as a new .dxe file.
- Select the location and give it a proper name.
- Click Save to go to the next step.
- In the Data Extraction – Define Data Source (Page 2 Of 8) dialog, change the selection from the default to Select Objects In The Current Drawing.
- Using the selection icon to the right of the option, select the point blocks in the drawing, press ↲, and then click Next.
- In the Data Extraction – Select Objects (Page 3 Of 8) dialog in the Display Options section, clear all check boxes with the exception of Display Blocks With Attributes Only. The BLOCKPOINT object should be the only item displayed and selected in the object area. Click Next.
- In the Data Extraction – Select Properties (Page 4 Of 8) dialog, in the Category Filter area, clear the selection for everything but the Attribute and Geometry filters.Once these two filters are selected, you will have options for which properties you want to extract.
- To have a working PNEZD file, select and extract the following:
- POINT property for the Point Number
- Position Y for the northing
- Position X for the easting
- ELEV property for Elevation
- DESC property for Description
- Check the selection for the items listed here, clear the ones not in the list, and click Next.
- In the Data Extraction – Refine Data (Page 5 Of 8) dialog, clear the selections for Show Count Column and Show Name Column.You will be left with the five known columns for a PNEZD file, which you will need to rearrange to meet your point format requirement.
- Select the column headers and drag them into this order from left to right: POINT, Position Y, Position X, ELEV, and DESC. Click Next.
- In the Data Extraction – Choose Output (Page 6 Of 8) dialog, select to output data to an external file.
- When you see the file path and file type the data will be saved into, click the ellipsis icon to select a new path.
- Select where you want to save, select the name for the file, and choose .xls from the Files Of Type drop-down menu.
- Click Save to exit the dialog and Next to advance to the next step.Clicking Next will take you to Page 8. In this particular workflow, you will not see Page 7.
- In the Data Extraction – Finish (Page 8 Of 8) dialog, click the Finish button to end the extraction process.
- Open the file in Microsoft Excel and delete the first row, which contains the header cells.
- Save the modified file as CSV (Comma Delimited) by doing the following:
- Browse to a location of your choice.
- Assign a name to the file.
- Click Yes in the Microsoft Excel dialog warning about the loss of functionality when saving to CSV.
- Click Yes to force the file to close.
- In Civil 3D, using the Import Points option from the Creation Points toolbar, choose PNEZD (Comma Delimited) as the format for points, and select the created CSV file as the source for the data.
- Add the points to a point group.A point group called Mastering Survey Data is already in the drawing, so you can use that as the point group for the insertion of this data. Once the import is complete, the points will be created in the drawing, and you can safely delete the source blocks or change their layer if you still want to keep them in the drawing.The Extraction file (.dxe) can be used for future extractions that match the settings for your non–Civil 3D data.
- Save the drawing.
===o0o===
