Table 12.1 Important lot-line tools
| Icon | Tool |
|---|---|
 | Add Fixed Line – Two Points |
 | Add Fixed Curve (Three Point) |
 | Add Fixed Curve (Two Points And Radius) |
 | Draw Tangent – Tangent With No Curves |
- Open the drawing named Using the Lot Line Tools.dwg located in the Chapter 12 class data folder.
- On the Home tab of the ribbon, click ParcelParcel Creation Tools.
- On the Parcel Layout Tools toolbar, click Add Fixed Line – Two Points.
- Click OK to accept the defaults in the Create Parcels – Layout dialog box.
- Zoom in to Jordan Court near station 4+00 (0+100). Hold down the Shift key, and right-click to open the Object Snap context menu.
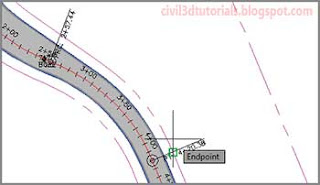
- Click Endpoint. Then click the end of the magenta curve at station 4+20.38 (0+128.13), as shown in Figure 12.6.

Figure 12.6 Snapping to the end of the curve to begin creating a new parcel line. - Hold down the Shift key and right-click. Select Perpendicular.
- Click the magenta back lot line, as shown in Figure 12.7. Press Esc twice to end the command. You have created a new parcel near the front entrance that will be used for a community clubhouse and administrative offices.

Figure 12.7 Snapping to a location that is perpendicular to the eastern lot line. - Click ParcelParcel Creation Tools on the Home tab of the ribbon.
- Click Draw Tangent – Tangent With No Curves, and then click OK to dismiss the Create Parcels – Layout dialog box.
- Using the Endpoint object snap, trace the fence line that surrounds the existing farm buildings. Begin at the north end of the fence and work toward the south and west.
- Once you have selected the last point on the fence, use the Perpendicular object snap to select the western boundary line, as shown in Figure 12.8.

Figure 12.8 Completing the farm property boundary by clicking a point perpendicular to the west property boundary - Press Esc twice to exit the Parcel command. You have created a new parcel that will remain the property of the original landowner.
Tips:In an actual project, to delineate this boundary properly, you would probably offset it a short distance behind the fence so that the fence is entirely on the landowner’s property.


- Using the Lot Line Tools
- Using the Parcel Sizing Tools
- Using Parcel Sizing and Layout Parameters
