
The layout parameters available to you are listed here. The image next to each parameter matches the schematic preview shown in the bottom of the Parcel Layout Tools toolbar as you click each parameter.
 Minimum AreaThis is the minimum area occupied by the lot. Minimum area is a common requirement that designers must meet to satisfy zoning requirements.
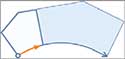 Minimum FrontageThis is the minimum length of the lines or arcs that make up the side of the lot that is coincident with a road right-of-way. This is also a common parameter that designers must meet to satisfy zoning requirements.
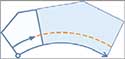 Use Minimum Frontage At OffsetSome zoning regulations allow the frontage to be measured at the building setback line rather than at the frontage line itself. This would enable you to create a larger number of smaller lots, especially when creating lots along the outside of a curve.
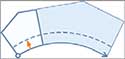 Frontage OffsetThis parameter is typically used to define the building setback line.
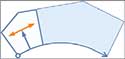 Minimum WidthThis is the minimum width allowed for the resulting parcel.
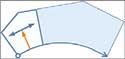 Minimum DepthThis is the minimum depth allowed for the parcel, measured perpendicular to the frontage at its midpoint.
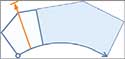 Use Maximum DepthThis parameter prevents the development of exceedingly deep lots, potentially enabling the area to be subdivided more efficiently.
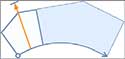 Maximum DepthThis is the maximum depth allowed for the parcel, measured perpendicular to the frontage at its midpoint.
 Multiple Solution Preference – Use Shortest FrontageWhen multiple solutions are possible, the one that produces the shortest frontage is selected.
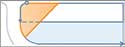 Multiple Solution Preference – Use Smallest AreaWhen multiple solutions are possible, the one that produces the smallest area is selected.
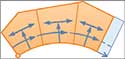 Automatic Mode – OnMultiple parcels are created within the selected area based on the parameters that have been specified.
 Automatic Mode – OffParcels are created one at a time, and you are prompted for information for each parcel.
The second parcel layout parameter is Remainder Distribution, which determines what is done with the “leftover” area after all parcels that meet the size requirements have been created. The Remainder Distribution options are as follows:
 Create Parcel From RemainderA new parcel is created that is smaller than the specified sizing parameters.
 Place Remainder In Last ParcelThe last parcel is oversized by adding the remainder to it
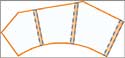 Redistribute RemainderAll parcels are oversized by a small amount so that the leftover area is spread across all parcels.
To use the parcel sizing and parcel layout parameters to create multiple lots, complete the following steps:
- Open the drawing named Using Parcel Sizing Parameters.dwg located in the Chapter 12 class data folder.
- On the Home tab of the ribbon, click ParcelParcel Creation Tools.
- On the Parcel Layout Tools toolbar, change Automatic Mode to On.
Tips:Automatic Mode will subdivide the area into as many parcels as possible while maintaining the current parcel size requirements.
- Click Slide Line – Create, and then click OK to dismiss the Create Parcels – Layout dialog box.
- When you’re prompted to select a parcel, click the label that reads Property : 30.
- When you’re prompted for the start point of the frontage, snap to the endpoint of the right-of-way line at the entrance of Jordan Court, as shown in Figure 12.13.

Figure 12.13 Selecting the beginning point of the frontage - When you’re prompted for the endpoint of the frontage, move your cursor along the west right-of-way line of Jordan Court and then along the north right-of-way line of Madison Lane. Move your cursor around the Madison Lane cul-de-sac and snap to the endpoint of the right-of-way line at the intersection of Madison Lane and Logan Court, as shown in Figure 12.14.
Tips:How you move your cursor will control the path taken by the orange jig line. If the jig line takes a wrong turn, move your cursor back to the frontage start point and start over.

Figure 12.14 Selecting the ending point of the frontage - When you’re prompted to specify an angle, press Enter. A preview of the parcels is shown.
- On the Parcel Layout Tools toolbar, type 0.333acres (or 0.135hectares) for Minimum Area and press Enter. The preview updates.
- Change the following settings (noting how the preview updates after each):
Minimum Frontage
Frontage Offset100 (35)
25 (8)Remainder Distribution
Multiple Solution PreferenceRedistribute Remainder
Use Smallest Area - Press Enter to create the parcels. Press Esc twice to end the command.


- Using the Lot Line Tools
- Using the Parcel Sizing Tools
- Using Parcel Sizing and Layout Parameters