QTO Manager is an all-purpose utility for compiling information about quantities in your design. (QTO stands for
quantity takeoff.) When you click
QTO Manager on the
Analyze ribbon
tab, Panorama will open, displaying a new tab titled QTO Manager
(See Figure 19.1). The main feature of this tab is the pay item list. Each
pay item in the list can be assigned to any number of objects in the drawing. QTO Manager works with nearly any type of Civil 3D or AutoCAD® software entity.
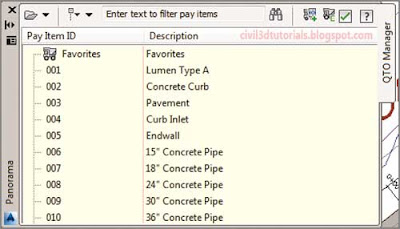 |
| Figure 19.1 The QTO Manager tab of Panorama. |
You may have already noticed that certain Civil 3D objects have a Pay Item property that is already integrated into the properties of the object. For example, a pipe network parts list has a Pay Item column where you can associate a pipe or structure with one of the same pay items that QTO Manager uses
(See Figure 19.2).
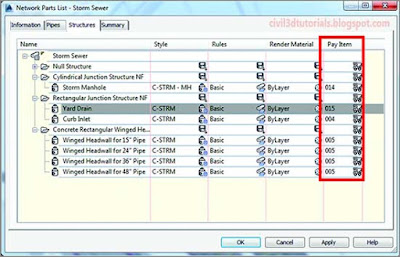 |
| Figure 19.2 A pipe network parts list with the pay item assignments highlighted |
The code set styles you used in
“Creating Cross Sections of the Design”, and
“Displaying and Annotating Sections”,to control the display and labeling of corridor sections can also be used to assign pay items to a corridor
(See Figure 19.3).
Once you have assigned pay items to objects in your drawing, you can execute the Takeoff command, which will gather up all of the quantities and present them to you in a report.
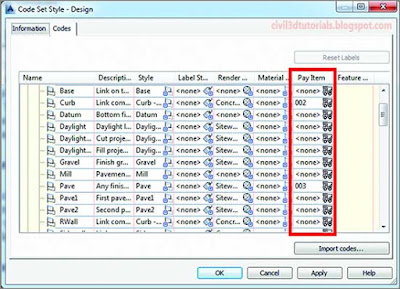 |
| Figure 19.3 A code set style with pay item assignments highlighted |
To calculate lighting, pavement, curb, and storm network quantities for your design, complete the following steps:
- Open the drawing named Calculating Quantities Using QTO.dwg located in the Chapter 19 class data folder. The top-right viewport is zoomed in to the recreation area, where you can see the proposed parking lot. There are several symbols representing light poles located around the perimeter of the parking lot. The paved area has been hatched with a dot pattern.
- Click the Analysis tab of the ribbon, and then click QTO Manager. Panorama will open, displaying the QTO Manager tab.
- Right-click Lumen Type A, and then click Assign Pay Item, as shown in Figure 19.4.
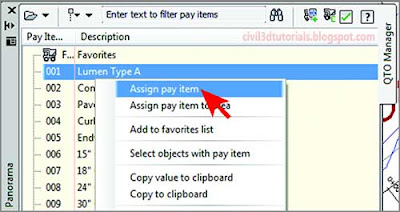 |
| 19.4 Assigning a pay item to an object in the drawing |
- In the top-right viewport, click the six light pole symbols and press Enter. There is no apparent change to the drawing, but the association between the pay item and the blocks has been established.
Tips:If you look at the command line, you’ll see that “Pay item 001 assigned to object” was reported each time you clicked a light pole.
- On the QTO Manager tab of Panorama, right-click Pavement and select Assign Pay Item To Area.
- At the command line, click Select Object. Click the hatch representing the paved area, and then press Enter. The command line should report that pay item 003 was assigned to an area.
- Right-click Concrete Curb and select Assign Pay Item. Zoom in to the parking lot, and select the two blue polylines representing the face of the curb: one for the perimeter of the parking lot and the other outlining the island in the center.
Tips:You have selected three different types of quantities: the number of light poles, the area of pavement, and the length of curb. QTO Manager is smart enough to know what value to extract based on what you select.
- Press Enter. Right-click Lumen Type A, and click Select Objects With Pay Item. Verify that all six light pole symbols are selected, as shown in Figure19.5.
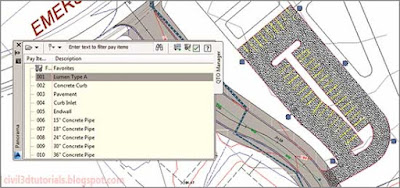 |
| 19.5 Light poles are selected through QTO Manager |
- Repeat step 8 for 18" (450mm) Concrete Pipe. In the left viewport, note the locations where 18" (450mm) concrete pipe has been utilized in the design.
Tips:This pay item was already assigned within the file before you opened it.
- On the Analyze tab of the ribbon, click Takeoff. The Compute Quantity Takeoff dialog box opens.
- Verify that Report Type is set to Summary, and uncheck the Report Selected Pay Items Only box. Click Compute.
Imagine the Possibilities
Imagine associating all of the key components of your design with pay items in QTO Manager. You now have a spatial relationship between a materials list and your project. This becomes especially useful during construction. For example, a contractor could use this to determine where to stage different sizes of pipes until it is time to install them. If an item is unavailable, the contractor could determine which areas of the project are impacted. These are just two examples of the usefulness of the QTO feature even before a report is generated.
- In the Quantity Takeoff Report dialog box, select Summary (HTML).xsl from the drop-down list at the lower-left corner. A summary report is displayed that includes the pay items you assigned as well as those that had already been assigned to the storm pipe network (See Figure 19.6).
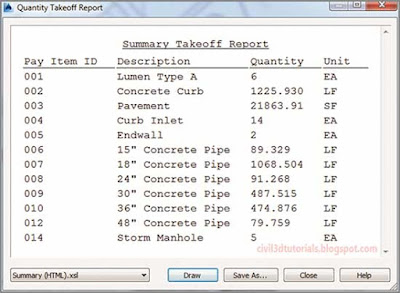 |
| 19.6 A summary takeoff report |
A Note about Units
Throughout this discuss, you’ll notice that two values are provided for units of measurement. The first value is provided for the imperial system that is used in the United States, and the second value, in parentheses, is provided for the metric system that is used in many other countries. These values most often represent imperial feet and metric meters. It is important to note that, generally, only the numeric values are entered in the software, not terms like feet or meters. Also, you should know that the two numbers provided are not necessarily equal. In most cases, they are similar values that are rounded to work efficiently in their respective measurement systems.


