Prospector allows you to explore your drawing file for Civil 3D objects, which makes assessing object data contained in a drawing a lot easier. Any objects will be listed under their corresponding object branch. When an object branch is expanded by clicking the plus sign to its left, Civil 3D named objects of that type are listed within the branch. Some branches, such as alignments, display object type branches when expanded. You can then expand the type branch to display the named objects of that type.
The Points branch is actually referred to as a
collection. It does not expand, but it contains objects that can be displayed in Panorama. At the top of Prospector, you will see a pull-down menu giving you the following options:
Active Drawing View and
Master View.
Active Drawing View displays the following branches:
- The current drawing
- Data Shortcuts
Master View displays the following branches:
- All Open Drawings
- Data Shortcuts
- Drawing Templates
Master View displays every drawing you have open in the active session. The name of the active drawing you are working with appears at the top of the list in bold. To make another open drawing current, just right-click its name in
Prospector and select
Switch To.
In
Master View, the Drawing Templates branch will contain templates saved in the path defined in
Options ➢ Files tab ➢ Template Settings ➢ Drawing Template File Location. You may open a template or create a new drawing with a template by right-clicking it and choosing either option from the right-click menu.
Besides the two view options, Prospector has a series of icons across the top that toggle various settings on and off. Let’s take a closer look at those icons:
 Item Preview Toggle
This icon enables an object’s graphic preview at the bottom of Prospector when Show Preview is enabled for the object category.
 Refresh Icon
When Master view is enabled, the Refresh icon will display. The Refresh icon is operational only when in the Autodesk Vault Environment. Clicking it will refresh the status icons for the Vault project.
 Preview Area Display Toggle
This icon will be active only when Toolspace is undocked. This button moves the preview area from the bottom of the tree view to the right of the tree view area.
 Panorama Display Toggle
This icon provides one of several ways to turn on and off the display of the Panorama window. The icon will be grayed out if there are no active warnings or if you have not yet viewed data in the Panorama window. You can always return to the Panorama window, regardless of your warning status, by clicking the Event Viewer button from the Home tab ➢ Palettes panel.
 Help
HelpDon’t underestimate how helpful Help can be!
Help Using Help
At any time during your use of Civil 3D, you can use the F1 key to bring up the help file relevant to the dialog you are working in.
Even for seasoned users, Help provides a comprehensive reference to objects and options. The most difficult part of using Help is knowing what terminology is used to describe the task you are trying to perform. Luckily, you have this book to assist you with that!
The Data Shortcuts branch provides access to shared Civil 3D objects across the project, which are objects that can be referenced into the current drawing and updated dynamically from their source. Each main grouping under the drawing name is referred to as a branch. If you expand a branch by clicking the plus sign next to its name, you will see the contents of that branch. Also, you will notice that some of the branches are subcategorized based on their functional class. For example, by expanding the Alignments group, you will notice the functional subdivision based on the purpose for that object. In the case of the alignments, this categorization is assigned on object creation but can be changed at any time in the
Alignment Properties dialog.
Because all Civil 3D data is dynamically linked, you will see object dependencies as well. You can learn details about an individual object by expanding its group type collection and selecting the object.
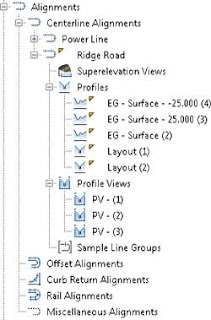 |
| Figure 1: A look at the Alignments group branch of the Prospector tab. Profiles and Profile Views are linked to alignments; therefore, they appear under Alignments. |
When an object branch is selected, the bottom of Prospector displays the Item View. Clicking the plus sign next to the object branch also provides you with the list of the objects created under that object type. Using the Item View, you can edit the object’s name, description, and style without having to open the Civil 3D Properties dialog. Right-clicking the object type gives you access to a number of commands that apply to all the members of that collection. For example, right-clicking the Point Groups branch brings up the menu shown in the following Figure.
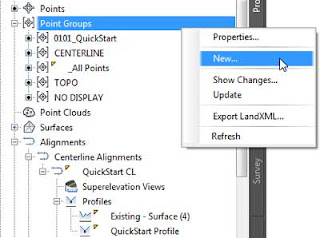 |
| Figure 2: Context-sensitive menus in Prospector for creating new objects. |
In addition, right-clicking the individual object offers many commands unique to Civil 3D, such as Zoom To and Pan To. By using these commands, you can find any parcel, point, cross section, or other Civil 3D object in your drawing almost instantly.
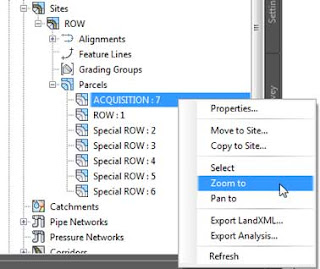 |
| Figure 3: Zooming to a specific object. |
For example, if you are interested in locating a parcel named using the Zoom To command, locate the Sites branch on the Prospector tab of Toolspace. Expand Proposed Site and highlight Parcels. Select the Parcel object either from the Item View or from the expanded Parcels collection, right-click, and select Zoom To. Civil 3D will locate the object and zoom to its whereabouts.
 |
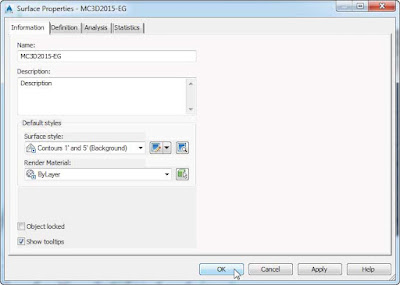 |
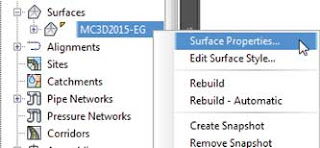
| Figure 4: The Civil 3D object Properties dialog allows you to define the object’s name, style, and definition and perform specific tasks in some cases. |
Also, note that by using the Properties option shown under the context menu for the object (see
Figure 4-top), you can access its settings. Within the dialog that opens, you can modify the object’s name, select its Civil 3D display style, and change its description, among other tasks (see
Figure 4-bottom).As you navigate the tabs of Toolspace, you will encounter many symbols to help you along the way. Table 1 shows you a few that you should familiarize yourself with.
Table 1. Common Toolspace symbols and meanings.
| Symbol | Meaning |
|---|
 | This represents the object or style is in use. It also appears when there is a dependency to the object or if the style has child styles. For example, you will see this icon on a surface when a profile has been created from it. |
 | Clicking this will expand the object branch of Toolspace. |
 | Clicking this will collapse the object branch of Toolspace. |
 | This indicates a collection. Data resides in a collection, and more information will be listed in the Item View. |
 | The object needs to be rebuilt or updated. This can also indicate a broken data reference. |
 | Civil 3D may still be processing the object, or the collection of Prospector needs to be refreshed. |
 | This symbol next to an object indicates that the object is data referenced from another drawing. A larger version of this icon is shown next to the Data Shortcuts branch of the Prospector tab. |
 Prospector allows you to explore your drawing file for Civil 3D objects, which makes assessing object data contained in a drawing a lot easier. Any objects will be listed under their corresponding object branch. When an object branch is expanded by clicking the plus sign to its left, Civil 3D named objects of that type are listed within the branch. Some branches, such as alignments, display object type branches when expanded. You can then expand the type branch to display the named objects of that type.The Points branch is actually referred to as a collection. It does not expand, but it contains objects that can be displayed in Panorama. At the top of Prospector, you will see a pull-down menu giving you the following options: Active Drawing View and Master View.


